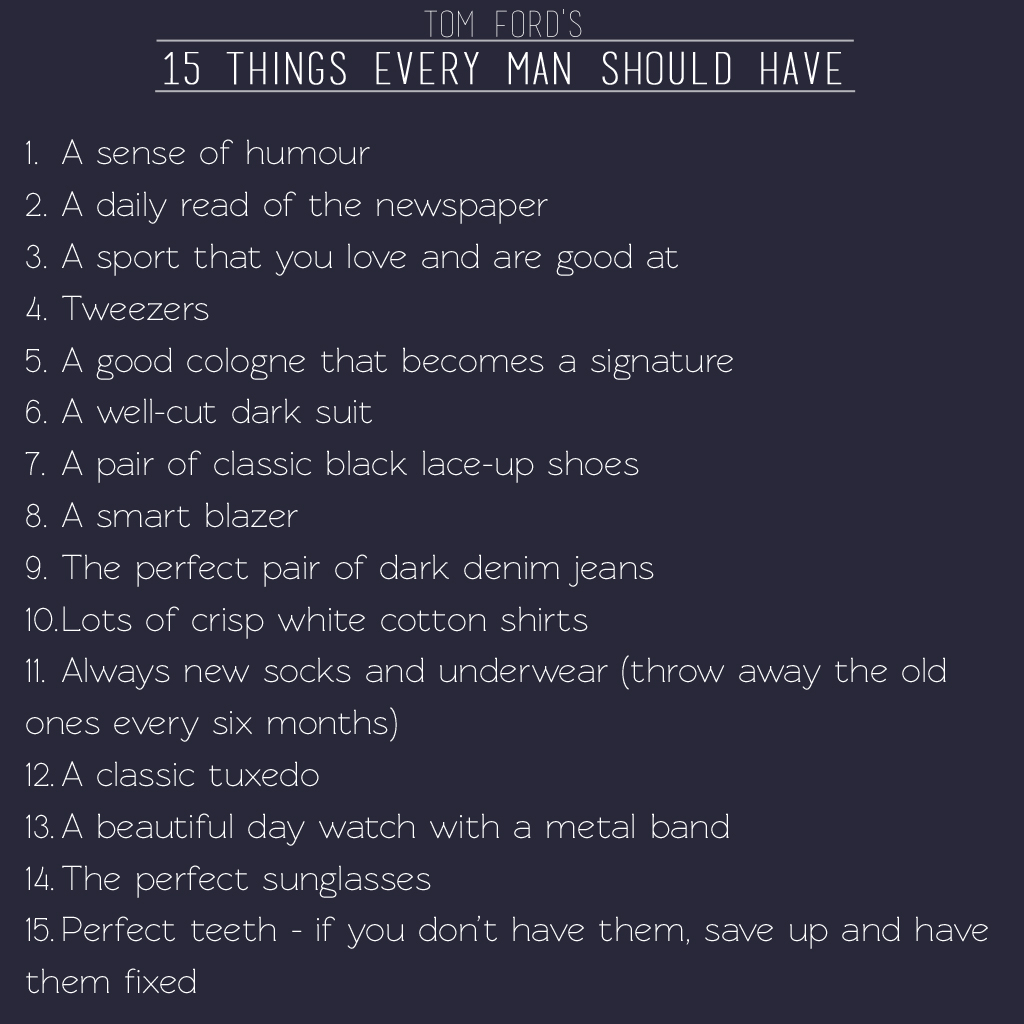
Some of you may be confused by the title of this post. After all, isn’t this a blog for women? Yes, it is (although I don’t discourage male readers!). However, this post is for the men in your life. It’s for your boyfriend, husband, fiancé, brother, dad, uncle, and friend. After all, our men should look and feel just as good as we do, right? While they may not read this blog, you can certainly drop them a helpful hint by, say, leaving this page open on your computer screen or casually forwarding them the link….
Guys, listen up: Tom Ford is pretty smart and he knows what he’s talking about! It’s always a good idea to take advice from someone who knows how to give it. Just think of this list as your new manifesto (and go throw away your old undies).
Have you ever met a girl who didn’t like shoe shopping? I don’t think I have. But sometimes us girls succumb to the aesthetic appeal of a pair of shoes without thinking about how badly our feet will be throbbing at the end of the night. Am I right? The good news is that there are shoes out there that can be cute and functional (and not make us wish we were walking barefoot instead)! Keep reading for my ultimate shoe shopping tips below!
1. Never, ever buy a pair of shoes without trying them on. I figure this is a no-brainer for most, but I just had to say it.
2. Never buy shoes that don’t fit, no matter how cute they are!
3. For flats: you may need to go up 1/2 or even one full size. For example, I usually wear an 8-8 1/2 in heels but I always wear at least a 9 in flats. This is because your foot is spread out more in a flat shoe.
4. For heels: always try on heels at the end of the day when you feet are the most swollen. This will give you an idea of what they will feel like after a long day (hint: they shouldn’t be tight or rub in any spots). A peep-toe heel will make your foot slide forward more, so try sizing down 1/2 size for a better fit. A slingback heel will give your foot more room in the back, which may cause the heel to slide off. Again, try sizing down 1/2 size for a better fit. In heels, your feet should never feel sausaged-in (not a word) nor should the heel be sliding off the back of your foot.
5. Synthetic materials tend to be extremely unforgiving and can tear up your feet. Suede and leather shoes will stretch after a few wears and will be infinitely more comfortable.
6. Arch support is very important in both flats and heels. If the arch in a heeled shoe is in the wrong place for your foot, it will cause foot pain due to pressure placed on the wrong spots.
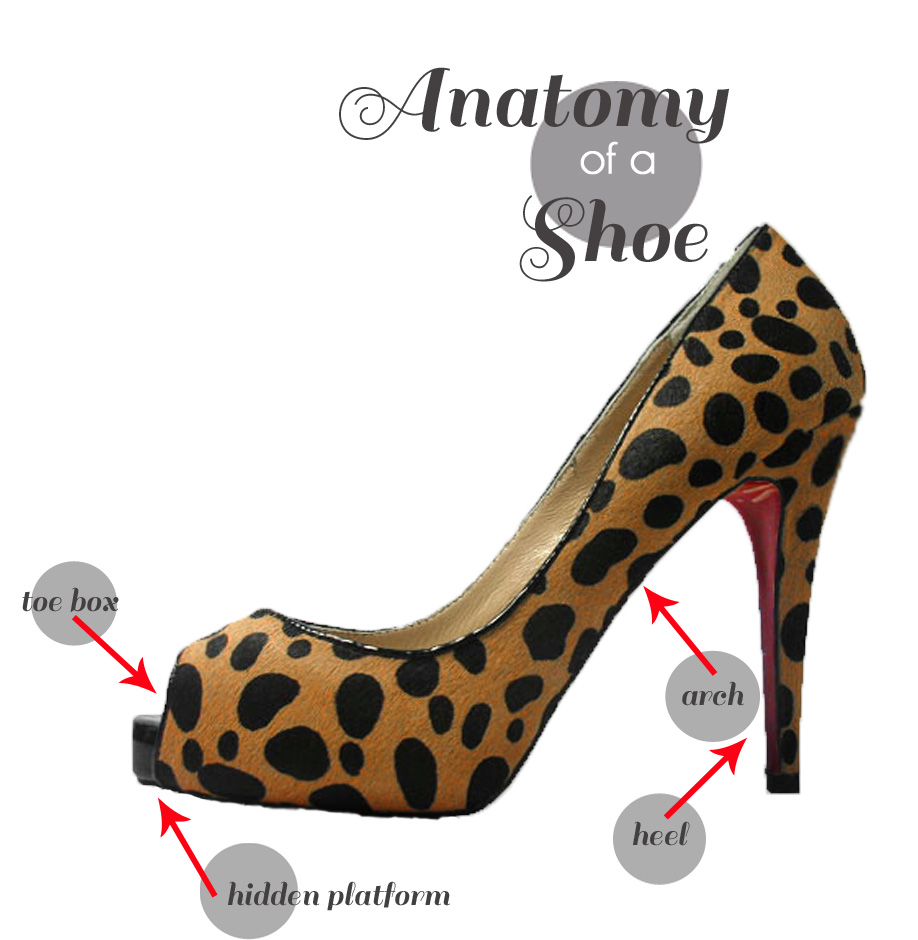
7. Heels with some sort of platform are easier on the balls of your feet and are usually more comfortable. If you’re not into looking like you’re wearing platforms, try searching for a pump with a hidden platform (like these).
8. Sometimes, the shoe just doesn’t fit. If you’ve tried it on in multiple sizes and it still isn’t feeling comfortable, don’t buy it.
9. With both heels and flats, having enough room in the toe box is very important. Long-term wear of ill-fitting shoes that pinch your toes can cause foot problems such as bunions, ingrown toenails, and corns.
10. When trying shoes on, make sure to walk on both the carpeting and the tile in the store. Many shoe departments are carpeted because it is softer on your feet, but this may be misleading.
11. Never underestimate the power of a good cobbler. I got a pair of knee high leather boots last fall that were slightly tight in the calf area. For $12, my local cobbler gently stretched the leather out (without ruining them) and now they fit perfectly! Cobblers can also resole your favorite pair of shoes or add a rubber sole to slippery heels. Don’t forget to utilize them!
12. Finally, don’t be afraid to splurge on a quality pair of shoes. I sometimes tend to cheap-out on clothing, but I take my footwear very seriously and only buy truly quality shoes that will last a long time and are comfortable from the moment I try them on.
The 5 essential pairs of shoes every woman should have:
A lot of women tend to get into makeup ruts (myself included). I also have the tendency to keep using a product even though it may no longer work for me. However, over the years I’ve been able to perfect my daily makeup routine into 9 easy steps with my tried-and-true favorite products that I use every. single. day. Keep reading to find out what my favorite everyday makeup is and how to look truly gorgeous on the daily!
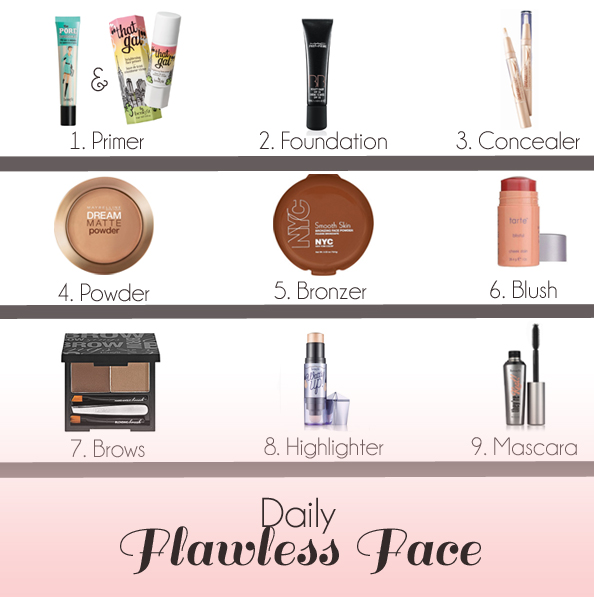
1. Start by priming your face. On the back of your hand, mix together a tiny squirt of Benefit the POREfessional and Benefit “That Gal” to create a balm. Spread all over your face with a paddle foundation brush, focusing on your t-zone.
2. Apply M.A.C. BB Cream foundation. Squirt a small amount onto the back of your hand. Use a dampened beauty blender sponge (that has been squeezed under running water 10 times) to blend foundation into skin using a buffing motion. Apply a second layer and blend as needed.
3. Dot Maybelline Dream Lumi Touch highlighting concealer under eyes and on the inner corners of eyes. Gently blend with your ring finger.
4. Using a large, fluffy powder brush, dust Maybelline Dream Matte pressed powder onto t-zone. Dust over closed eyes to set the concealer and to add a thickening layer to your eyelashes.
5. Using the same fluffy powder brush, swirl into NYC Smooth Skin bronzer (in Sunny). Tap and dust off excess product on the back of your hand. It is very important to always start off with a small amount of bronzer and slowly build the color onto your face. Starting below your cheekbone near your ear, gently dust the bronzer onto your face, moving in tiny up-and-down movements while slowly working your way in towards your mouth. Repeat this process again below the other cheekbone, making sure to dust off excess bronzer before ever touching your face with the brush. Dust a tiny bit of bronzer on your temples, hairline, jawline, and down the bridge of your nose.
Pro tip: always use a matte bronzer with no trace of shimmer or sparkle to avoid looking clownish.
6. Apply Tarte Cheek Stain to cheekbones and blend up towards your temples and out towards your hairline with your fingers. This blush has a gel-like consistency and gives a very natural-looking flush.
7. Fill in your brows using an angle brush with Benefit Brow Zings. Start 1/4-1/2″ away from the start of your brows to avoid a heavy-handed look. Fill them in using light, feathery strokes and working your way through to the tail. Accentuate your arches because they’re the money-makers of your eyebrows! After you’ve filled them in, run a clean spoolie brush through them to add softness, fullness, and to make them look more natural.
Pro tip: filling in your brows is the one step that makes your look completely polished and the one thing I’d never leave the house without doing!
8. Apply Benefit Watt’s Up! highlighter to your browbones, cheekbones, inner corners of your eyes, down the bridge of your nose, and your cupid’s bow. Be sure to softly blend it to create glowing, radiant skin. Also, apply the Maybelline concealer from step 3 underneath the length of your brows and above the upper outer half (past your arch). Blend gently with your ring finger but do not wipe off.
9. Curl one set of eyelashes. Apply Benefit They’re Real! mascara to upper lashes only. Hold the brush horizontally and, starting at the base of your lashes, wiggle in a zig-zag motion up through the tips. Then, flip the brush vertically and use the spiky tip to comb through any clumps, focusing on getting into the outer corners to coat every lash. Repeat on the other eye.
With your newly flawless face, the possibilities are endless! Feel free to swipe on some bright lipstick, a fun eyeshadow, or bold eyeliner (just not all at the same time, please!). Now put your best face forward, gorgeous!
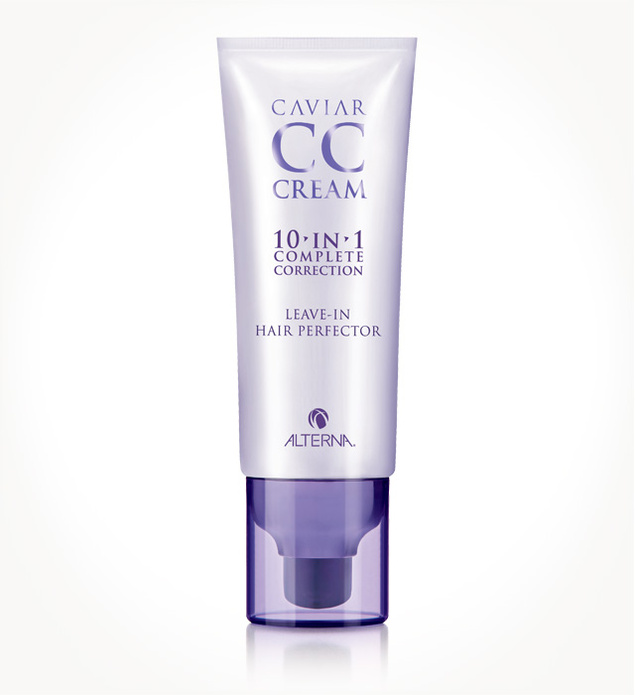
It’s not often that a product like this comes around… and when it does, you just want to shout it from the rooftops! I scored a deluxe sample of this hair magic at Sephora a few weeks ago and I’ve been in love ever since. Like most girls, I was used to my usual schtick of using 3+ products on my hair: one for sleekness, one for volume, one for heat protection, etc. Then, along comes this CC cream which takes care of everything. Shine? Check. Moisture? Check. Manageability? Check. Heat protection? Check. I have pretty (ahem) difficult hair that usually takes a lot of work to manage. Since I’ve started using this product, my hair has been so easy. I also color treat my hair fairly regularly, which inevitably leads to damage and dullness. Never has my hair been so shiny and silky! I LOVE THIS STUFF. Go buy it now (you think I’m kidding?). You will love it.
XO, J
P.S. It’s also free of parabens, sulfates, phthalates, synthetic color, paraffin, gluten, DEA/TEA, mineral oil & petrolatum!